
Refurbishing Griffith Labs White Milk Glass Spice Jars
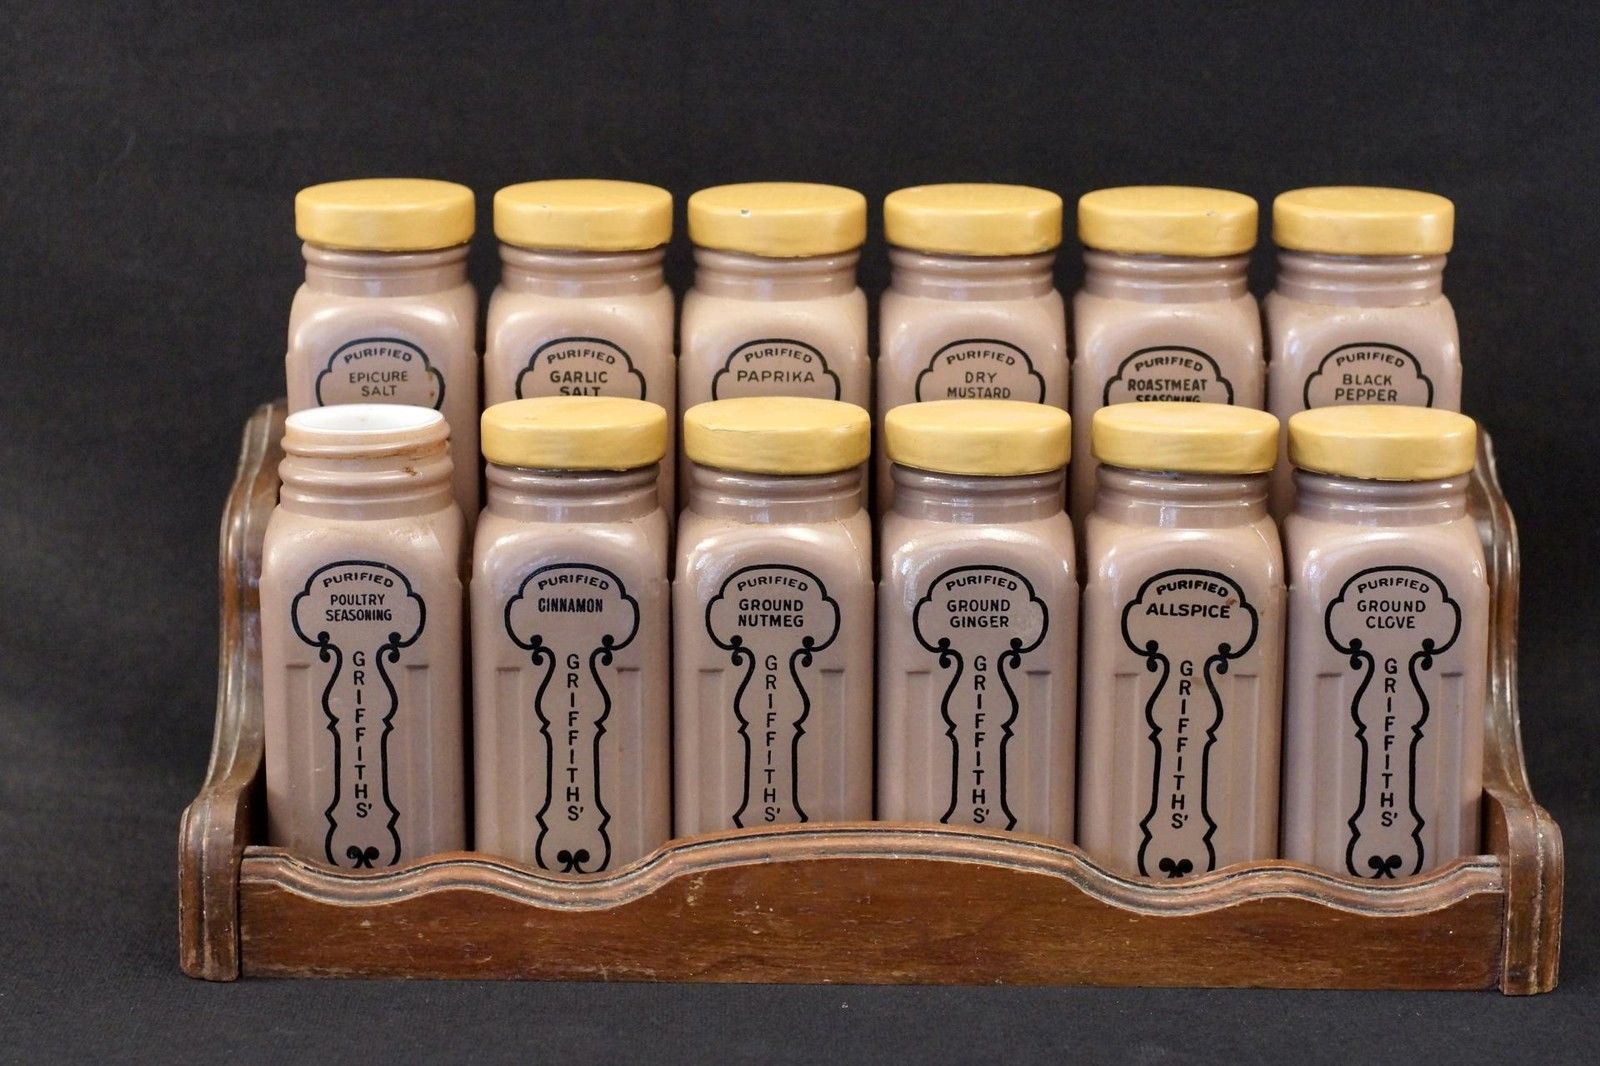
I am completely hooked on these wonderful, old spice jars! The clean design blends with just about any type of kitchen decor from country cozy to sleek sophisticate. The straightforward layout of the label is easy to read - even when they are grouped together. Thinking about getting a set to use in your kitchen? Want to add to the collection of vintage Griffith spice jars that you already own? This helpful project guide will enable you to succeed with refurbishing these lovely old spice jars ( or any other white milk glass spice jar with a removable label) to create a beautiful, orderly, useful and up-to-date spice collection.
A Word about Refurbishing or Re-doing Griffith Spice Jars
Only jars with the labels missing or partially torn off are fair game for refurbishing. Please, please do not refurbish or destroy a complete set of Griffith Spice Jars that are in perfect original condition with the original labels intact, the shaker inserts, metal lids and /or original spice rack! Intact original sets should be left untouched - used, appreciated and loved for their historical and collectible value.
Removing the back paper labels: Whoever made the original glue for these labels knew what they were doing! :-) Removing the back paper labels is tougher than removing the front labels. GooGone and WD-40 - usually sure-fire treatment for sticky labels did not work well. The best way to remove torn or partially missing paper labels is to soak them in warm or hot water. If you can get one edge up, run warm/hot water under that edge and repeat until the entire label is wet. Once the label is completely saturated, you can gently scrape it off using a dull implement. If you want to preserve the label, lay it out flat to dry. The paper behaves like it is hand-made when it is wet so, lay them out flat, smooth out the wrinkles and mend the tears. Clean the remainder of the glue off the jar using warm, soapy water and a scrubby or plastic sanding sponge, no metal!
Removing the front labels: The yellow painted-on label will flake off with a gentle scraping using a dull, flat implement. The paper labels will scrape off after a good soak in hot water. The black labels can not be removed. After a closer examination, and many attempts to scrape it off, I think these may have been fired in a kiln. I thought that one should be able to cover up the original spice name text and apply a new label. But, unless you use a tiny strip of paper label cut to fit over the existing spice name text, it is a definite "no can do." Neither glass or acrylic paint worked because it will not blend into the color of the jars.
Removing the shaker inserts: The jars for powdered spices usually have a bare metal or painted metal twist-out shaker insert. The typical colors are silver, gold, or painted red, white and black. Each metal shaker insert has small protrusions on the outside that enable them to "snap" lightly into the spice jars. To remove, place your thumb or forefinger against an inside surface, push in gently and rotate slightly counter-clockwise. If the insert is rusted or will not move, gently pry up one edge using a thin implement. Gently run the implement around the edge until it is lifted up and out. The 3" jars have a plastic insert that can be removed by prying up one edge or inserting an implement into one of the holes and gently lifting up.
Washing the empty spice jars: Yes, you can wash and dry unlabelled jars in the dishwasher. If you have a jar that is particularly dirty, clean it out as best you can beforehand. Compacted old spice can be removed by emptying out the loose spice, filling the jar with hot water, poking holes in the spice, and let the water penetrate. Repeat as often as needed. Walter Drake sells bottle brush cleaners with a cotton mop-type tip on a twisted metal handle. Or, check here on e-Bay. Most of the handles are a little too thin and bend so easily that you can not scrub hard. But, with some effort, they will get the corners cleaned out. If your jar has a lid or shaker insert that is rusted in place or frozen, WD-40 or hot water will help loosen it. In the dishwasher, place each jar so that it can rotate freely on the spindle during the wash cycle without touching others. Every other spindle, staggered by rows, top or bottom level worked for me. Some jars may need to be wiped out by hand afterwards so check before filling them.
Cleaning the spice shaker inserts: If you put the metal shaker tops in the silverware basket of the dishwasher, some will float out. Better to clean them by hand with a plastic sanding sponge. If they are painted, it will probably come off. If they are rusted, use a sanding sponge or a piece of a Brillo pad. Be careful! They will break - especially if they are rusted through. Sand until bare metal shows then, repaint in the original color with a food-safe paint or sealer if you wish. Definitely clean the plastic shaker inserts by hand - they are too small for the dishwasher.
Cleaning the metal / tin lids: Lids usually fare well in the silverware basket. But, wash them by hand so that you can see exactly what needs to be done to get them clean and ready for new paint. Further sanding and cleaning should be done with a plastic sanding scrubby sponge. Be careful when sanding! Then lids will crack and break - especially if they are rusted through. Even fine steel wool may be too harsh for some badly damaged lids. Be sure to check inside of the lid, under the paper liner and remove any rust. Old, stained paper liners should be removed and replaced if you wish, for sanitary reasons. Wash thoroughly around the inside lid and under the threads. While the original paint on these lids was probably enamel, a previous owner of your set might have used a water-based paint over it. Sand off the rust down to the bare metal. Sand smooth any area with peeled paint and they'll be ready for whatever color of oil based enamel paint that you choose to apply. To make sure that all layers of old paint are thoroughly dried, let them set for 24 hours after cleaning/sanding.
Painting the lids: The lids are lightweight and will move around if you try to spray paint them. Furthermore, there's no easy way to anchor them to a flat surface. After pondering this problem a bit, here is how I handled it:

I covered the top of the jar with a piece of waxed paper and screwed the lid back on. Voila! The jar is protected from over spray, the lid will be fully exposed so that you can access most surfaces of it without difficulty plus, it holds the wax paper in place. This method would probably also work with plastic wrap but it will not shield your hand. Afterward, you can stand them up, side by side, in a large flat box lid to spray paint the top and all sides or hold the jar in your hand and paint each one individually. Make sure that the hand holding the jar is covered. Wear latex or plastic gloves and keep your hand under the waxed paper on the jar. If you repaint in a color different from the original, you might need to paint in two steps: one for the top and sides and one for the underside edges of the lid where it meets the jar. Do not paint inside the lid.
After the lids are completely dry (allow 24 hours) remove the wax paper, reattach the lids, and display them proudly on your spice rack or shelf. Rustoleum paints are great. Krylon spray enamels worked very well and also come in a 6 oz size they call "Short Cuts" available as a spray or brush-on - just perfect for spraying two coats on a set of 8, 10 or 12 lids.